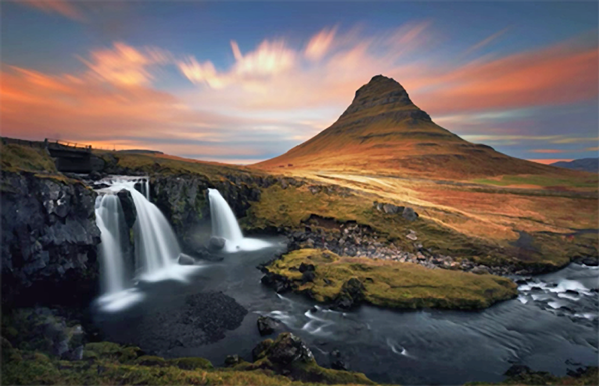
Natural light photography means that photos are taken with sunlight as the main illumination source. The amount of light that photographers have at their disposal varies depending upon the time of the day. Bright days can give you full illumination. A cloudy day can produce dramatic results. The quality of a natural lighting shot is also affected by the position and direction the sun. The sun's light must also be filtered through the atmosphere in order to achieve the desired mood, color, or texture.
Guide to natural light photography
Natural light photography uses sunlight to create your photos. This style is almost unaffected with artificial light. The sun's light intensity also changes throughout the day. To make better photographs, you must understand the basics of natural light. Understanding natural light will allow you to use it in a variety settings.
Using natural light is essential for capturing unique visual stories. Rachel Devine shares her tips on how to use natural light. One trick is to distract your family members by cooking something or conversing with them. This is a wonderful way to capture their emotions and not have to concentrate on the camera.
Techniques to work with it
You are not the only one who has ever wondered if natural light can be used in photography. There are many reasons why photographers don't like working with artificial light. You can learn about the subtleties of light, or just improve your skills with artificial lighting.
First, it is important to understand how light changes through the day. Natural light, unlike artificial light, is not constant and can vary dramatically. Natural light's ability to render a subject depends on the direction and weather conditions.
Negatives to shooting in natural light
Natural lighting is possible for free and can be a great way you take your photos. Because you don't need to bring the light source near to your subject, this type of light is ideal for wildlife, street and bird photography. It is also great for capturing subjects at large distances. Outdoor photography is a great option because you can capture more detail and create a more alive atmosphere. Natural light can sometimes be unpredictable so plan your shots accordingly.
Natural light is available and free, but there are some disadvantages. It is not always flattering, and can cause hard shadows. The downside to shooting in natural lighting is that you don't have much control over how bright it is. Unnatural colors and faces can result if you expose the sun too much.

Tips for capturing great shots in natural light
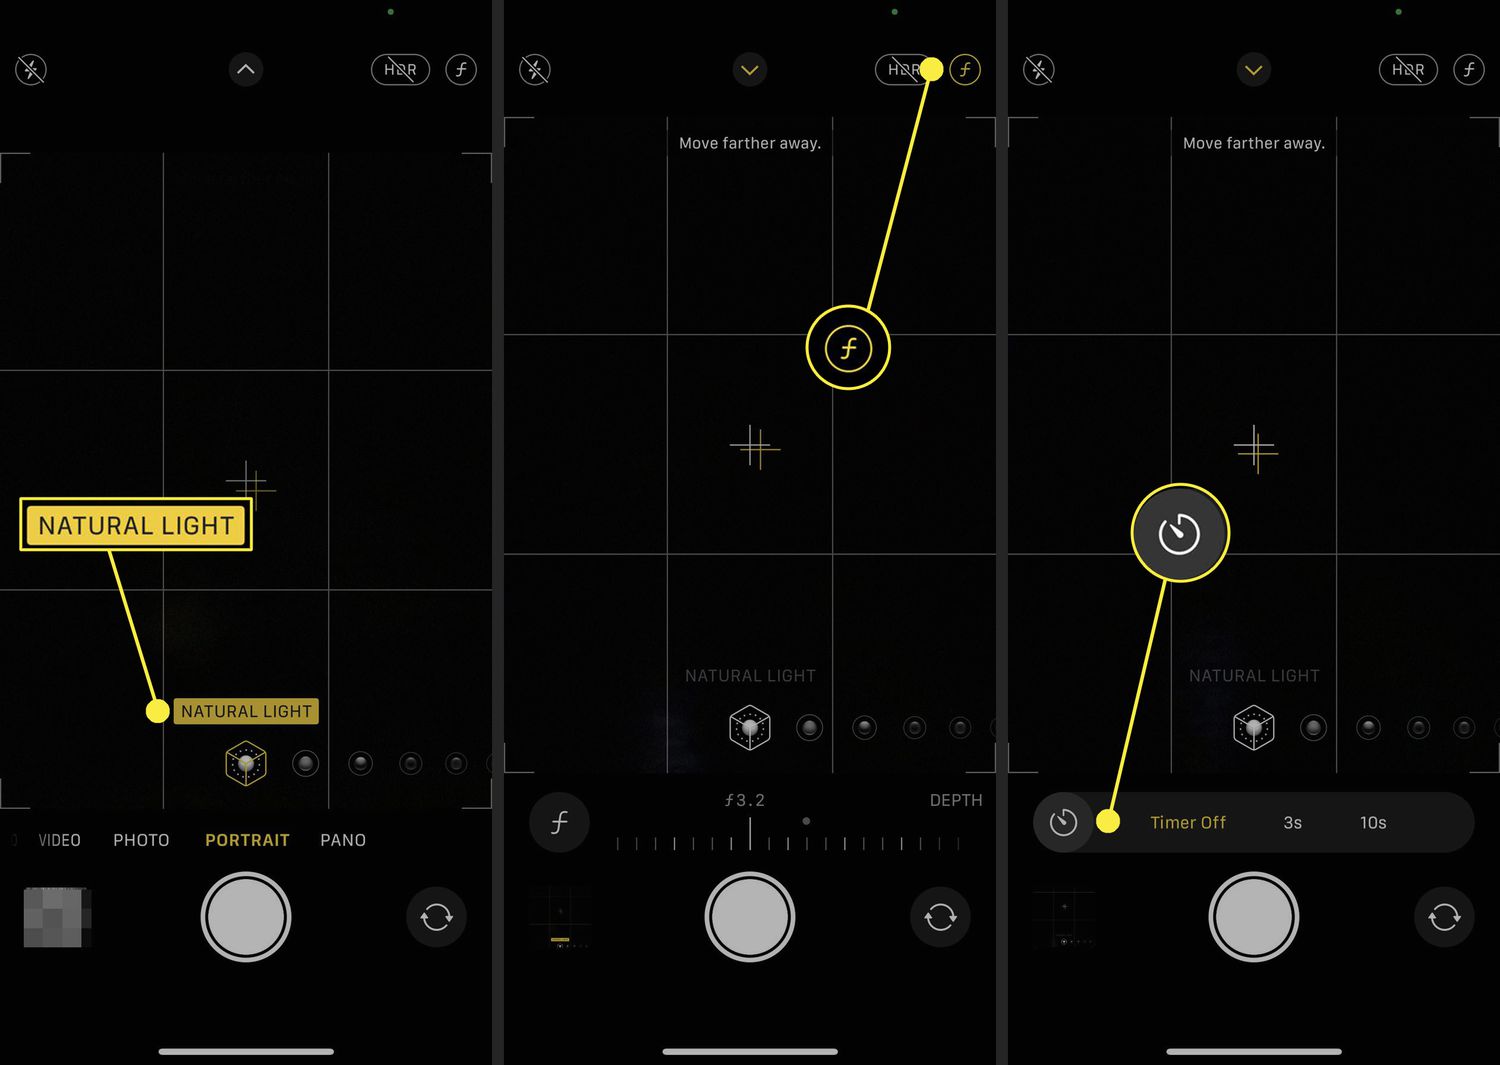
Using natural light is an art form that is hard to master, and there are some tips that can make the difference between mediocre shots and great ones. To get the best results, it is important to consider the location, time of day, and weather conditions. For example, windows are a great option for diffused, soft light indoors. To avoid shadows, make sure your subject is facing the light source. A reflector can also be used to diffuse the light and make it less harsh. Just remember to position the reflector opposite the light source, if it's available.
To highlight the most important features of your subject, you can also use filters. You can create the desired effect and show off your skills by carefully controlling the angle to the sun. Natural light comes in a range of colours and moods. This can make your subject appear cool and blue, or warm and gold. Human eyes naturally adjust colours to match the light, but a camera uses a setting called white balance to compensate for these differences.
FAQ
Is photography a talent or a skill?
Photography is not a skill, but an art form. This requires years of practice, training, and experiences. To master any aspect of photography, it takes years of practice and study.
Photography is a business. You must have a plan to make money.
You need to know what type of clients you are looking for and how you can reach them.
You need to know who they are and what they want. It is important to communicate clearly and convincingly with them in order to convince them to use your services.
You will need to be organized and ready for any meeting with potential clients.
A portfolio of your work is essential in order to be able to approach potential clients. This can be done digitally using software programs or printed onto paper.
After creating a portfolio you should look for opportunities to present it. This could include advertising online or directly approaching businesses.
What is the rule of thirds in photography?
The rule to thirds is a great way to create interesting compositions. It divides your image in nine equal parts, vertically and horizontally. This creates three main areas where you want your subject to appear. These are the top and middle thirds (in the upper left corner), as well as the bottom and lower right. These areas are useful for positioning your subject in your frame.
The rule of thirds also helps you avoid placing important elements too close together or too far apart. You might not have enough space between them for a strong visual impact if you put them close together. They may lose focus if they're too far apart.
How can I learn photography by myself?
There are many methods to learn how you can take amazing photos. You could buy a book, attend a class, join an online community, watch YouTube tutorials, etc. If you really want to learn how to take pictures, it's best to do it yourself. That way, you have complete control over what goes into each photo. As long as you continue learning, you will always be improving.
Digital photography doesn't require expensive equipment. All you require is an internet-enabled computer and a good camera. The rest is up to you.
Here are some tips to get you started.
-
Acquaint yourself with the manual settings of your camera.
-
Learn the basics of controlling your computer.
-
Take lots of photographs.
-
You can edit them.
-
Share them.
-
Keep practicing.
-
Experiment.
-
Explore different perspectives and angles.
-
Use light sources creatively.
-
Practice makes perfect.
-
Don't be afraid to fail.
-
Be patient.
-
Have fun
Statistics
- The second easiest way to get blurry photos 100% of the time is to use a cheap filter on the front of your lens. (photographylife.com)
- While I cannot prove that all of those spots were not sensor dust, the photo was taken during a heavy snowstorm…so I guess that 99.8% of the spots are snowflakes. (bhphotovideo.com)
- Get 40% off Adobe Creative Cloud(opens in new tab) (creativebloq.com)
- That's the easiest way to get blurry photos 100% of the time. (photographylife.com)
External Links
How To
How to take macro shots in photography
Macro photography is the ability to capture small objects, such as insects and flowers, at close range. Macro is a Greek term that means large. A lens with a focal length over 50mm can be used to take photos of objects very close up.
A good macro lens should have a long working distance and a fast aperture, so you can get sharp images without moving around too much. Avoid movement when taking photos, as any movement during exposure can blur your image.
Here are some tips to take great macro photos:
-
Use a tripod. Set up a table or chair so you don’t knock anything over. This will make it less likely that you are moving when shooting.
-
Pick the right lighting. Most macro lenses come with built-in light filters, but if you don't have one already, buy one separately. It prevents overexposure.
-
Be patient! Shooting macros takes practice. It's not always easy to see the perfect macro, but it is worth trying until you do.
-
Shoot in RAW format. RAW files are more detailed than standard JPEGs and contain more data. RAW files can be edited later and allow for more detail such as cropping and color correction.
-
Do not forget to add the background. Sometimes the background can add interest to your shot, even if you have a great foreground object. Include it in your shot.
-
Keep learning.