A drone is a great tool for taking photos. While there are many different drone models on the marketplace, there are some essential features you should consider. These are the sensor size, AEB mode, Tripod mode, and the rule of thirds.
Rule of thirds
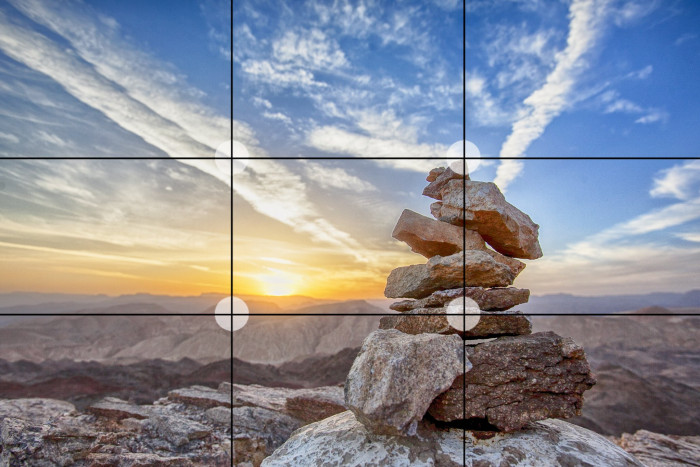
The Rule of Thirds can be used to create dynamic compositions. It's one of the best known photographic techniques. It can also be used for post-production.
You can apply the rule of threes to drone photography. This is particularly important because the majority of drone photos are of landscapes and cityscapes. The rule of Thirds helps ensure that the photo is balanced.
The rule to thirds divides the image into nine equal quadrants. It uses two horizontal and one vertical line. The horizontal line is located a third of a photo's length, while the vertical lines can be found a second third.
Color temperature
The right color temperature is key to making drone photography stand out. You can also use the right temperature to express your feelings in images. It is important for you to know that color temperatures are a function weather conditions and the time it is being taken.
Warm lighting, for example, can quickly change depending on whether the sun rises or sets. Cool lighting is usually present between one hour after sunrise and one hour before sunset.
Planning your photography shoots is key to determining the right color temperature for your shots. You will also have to factor in your drone's field of view. It is a good rule of thumb to space your photos between 25 and 30 degrees. This is the ideal number because overlapping images can produce a messy looking mess.
Sensor size
Having a good understanding of how to choose the right camera sensor size can be a very useful tool when it comes to getting better photos. A larger sensor size will help you capture more light to produce better images.
The advantages of larger sensors include higher resolution, greater dynamic range, lower noise levels, and higher resolution. The size of a camera's sensor is also an important consideration when it comes to capturing the best images in low light conditions.
There are many choices when it comes to cameras. A smaller sensor may be better for beginners. For more advanced photographers, though, you may want to look at a camera that has a larger image sensor.
Mode AEB
The AEB mode is a great option for drone photography. You can take multiple images of the same scene and blend them together using HDR software. It also gives you more control over the final image.
AEB is typically used by landscape photographers, real estate photographers and aerial photographers. It is also a popular feature for social media.
For great photos, you need to have the right exposure settings. These include ISO, shutter speed, and aperture. An ND filter can also be used to reduce the glare of light from reflective surfaces. This is especially important for low-light photography.
Tripod mode

Adding a Tripod mode to your DJI drone will allow you to produce smooth cinematic footage, while also giving you more control of your drone. This intelligent mode lets you change the angle of your flight without needing to use your remote controller. It allows you to avoid obstacles. You can use this mode indoors, as well as to capture storefronts and exterior buildings.
The DJI Mavic 2 offers a smart flight mode called Tripod Mode. It operates just like normal P mode but lowers the maximum speed. In Tripod Mode, your drone can fly at one meter per second. To adjust the angle of the drone, you can use DJI's app
Posting your work on social media
The process of getting a drone isn’t easy. Apart from the obvious difficulties, you will need to find a suitable place. There are many great AF communities. It's half the battle to get lucky and meet the right people. It's also a great way for you to meet new people and learn new tricks. You'll discover that you are also getting a great workout. Consider a drone for your next hobby.
You don't just have to fly your drone, there are many other aspects to it. Make sure you plan ahead.
FAQ
Do I Need A Tripod?
This is one of those questions that everyone asks. While a tripod may not be necessary all the time, it can prove to be extremely useful.
This allows you to keep your camera steady even when taking slow shutter speeds. A tripod can make all the difference when you're photographing landscapes or other stationary subjects.
On the other hand, if you're photographing moving subjects such as sports or people, using a tripod can cause blurriness. How can you tell which situations call for a tripod and why?
A tripod is useful in situations where you want to take pictures of fast action and stationary subjects. Examples include:
-
Sports
-
People
-
Landscapes
-
Close-ups
-
Macro shots
This test will help you determine if you need a tripod. Keep your camera still, and then look through the viewfinder. You will need a tripod if you see blurred lines and movement.
A tripod will not improve blurring if you don't notice it.
These are just a few tips to help you decide whether or not to purchase a tripod.
-
You should ensure that your tripod has smooth legs. This helps to prevent vibrations from shaking the camera.
-
Choose a sturdy tripod. Some tripods may be made from plastic, which can make them less durable. Opt for a sturdy metal tripod.
-
Consider purchasing a remote release. This allows you to control your camera remotely. You can set it to fire the shutter once you press the button automatically.
-
Make sure to look for a tripod that rotates 360 degrees. It makes it easy to position your camera horizontally or vertically.
-
You should keep in mind that tripods don't come cheap. Expect to pay around $100-200. You'll still get a lot for your money.
-
Accessories such as filters and memory cards should be considered.
-
Check your local stores before buying online. Many retailers offer free shipping.
-
Read reviews to determine what customers think about a particular product.
-
Ask your family members and friends to recommend similar products.
-
Visit forums and message boards to learn about customer experiences.
-
Find user reviews online.
-
Use websites like Amazon.com to compare prices and read customer feedback.
-
View photo galleries to see the different uses of tripods by photographers.
How can I learn how to photograph on my own.
There are many ways you can learn to take great pictures. There are many options: you can buy a book, take a class or join an online community. You can also watch YouTube tutorials. But if you want to master the art of taking pictures, there's nothing better than doing it yourself! This way you can control what goes into each photograph. And you'll continue to improve as long you keep learning.
One of the greatest things about digital photography, however, is the fact that you don’t need expensive equipment. All you require is an internet-enabled computer and a good camera. All else is up to you.
Here are some ways to get started.
-
Get familiar with your camera's manual settings.
-
Learn how the basic controls work.
-
Take lots of photographs.
-
Make sure to edit them.
-
These should be shared.
-
Keep practicing.
-
Experiment.
-
Take a look at the world from different perspectives.
-
Use light sources creatively.
-
Practice makes perfect.
-
Be willing to fail.
-
Be patient.
-
Have fun
Light Room can be used to enhance your photographs.
Start early to get the best photos possible for your project. It's better to take as much as possible, then select the best.
Lightroom makes this possible by showing you how different settings affect each photograph. These settings can be changed on the fly, without needing to return to Photoshop. This allows for quick experimentation with what looks good or not.
Statistics
- This article received 13 testimonials, and 100% of readers who voted found it helpful, earning it our reader-approved status. (wikihow.com)
- There are people out there who will pick at flaws they can only see in 100% crops of your photos. (wikihow.com)
- The second easiest way to get blurry photos 100% of the time is to use a cheap filter on the front of your lens. (photographylife.com)
- In this case, 100% of readers who voted found the article helpful, earning it our reader-approved status. (wikihow.com)
External Links
How To
How to take macro shots in photography
Macro Photography refers to the ability take pictures of small objects like insects and flowers at close range. Macro is a Greek term that means large. A lens with a focal length over 50mm can be used to take photos of objects very close up.
A macro lens that is good should have a long working range and a fast aperture to get sharp images. You also want to avoid movement while taking photos because anything that moves during exposure could blur your image.
Here are some ways to get great macro photos
-
Use a tripod. You can use a tripod if you don't own one. This way, you'll have less chance of moving while trying to shoot.
-
The right lighting is important. You can get a macro lens with built-in lights filters. However, if you don’t have one, you can purchase one. It helps to avoid overexposure.
-
Be patient! Shooting macros takes practice. It's not always easy to see the perfect macro, but it is worth trying until you do.
-
Shoot in RAW format. RAW files are more detailed than standard JPEGs and contain more data. RAW files are better for editing later as you can make adjustments such as cropping and colour correction.
-
It's important to remember the background. The background can sometimes add interest to your shot even though it is a foreground item. Make sure to include it in the photo.
-
Keep learning.