If you are a mountain photographer, there are some simple tips that can help you create stunning photos of these magnificent locations. First, he should visit the mountain site early in morning or late in the evening in order to capture the soft lighting of sunrise and sundown. For mountain photography, he should use a wide-angle lens. This will give the mountain base the appearance of floating above it.
Photographing mountains at different time of day
When photographing mountains, it's important to take into account the time of day. Sunrise and sunset are typically the best times to take pictures. However, mountains can block sunlight from reaching your camera or cut down on the golden hour. This could result in a poor photo.
Use a filter that is polarizing
A polarizing lens is an excellent tool for photographing in low light conditions. It reduces glare while enhancing colors. This filter can also reduce reflections in the scene and objects. It also reduces haze. Use a polarizing lens to capture mountainous scenes in amazing clarity.
Creating depth in a mountain photo
A mountain photo should have depth. This will enhance the sense that it is a scaled-down image. You can achieve this by taking a photo at a low vantage and then moving up. This allows the foreground to appear more detailed, and the middle ground less flat. An increase in elevation will give you a more realistic view of the world. By seperating foreground, background and middle ground, it will make it easier to compare sizes. You can use a wider lens with a longer focal length if you are taking the photo at higher elevations. This will make the mountains seem larger.
Wide-angle lenses are recommended
A wide-angle lens can be used to capture mountainous landscapes. There are both advantages and disadvantages. First, wide angle lenses often have larger frames than normal lenses. Because of this, a photographer can easily overlook the smaller details in the photo's foreground.
Use a 90-degree angle
Taking photographs from a 90-degree angle can help you create a unique and dramatic landscape. This is a great way to show the fullness of the landscape and minimize distracting details. It can also be used to incorporate seasonal elements and human subjects. The image should invoke emotion.
FAQ
Photography is a talent?
Photography is an art form, not a talent. It requires training, experience, and practice. It takes years of study and practice to become proficient at any aspect of the craft.
You need to plan how you will make money in photography.
You need to know what type of clients you are looking for and how you can reach them.
You must get to know them and their goals. It is important to communicate clearly and convincingly with them in order to convince them to use your services.
This means that potential clients will require you to be well-organized.
Before you approach potential customers, it is necessary to compile a portfolio. You can either create a portfolio digitally with software programs, or print it on paper.
After creating a portfolio you should look for opportunities to present it. You could approach businesses directly or post ads online.
Which Lenses should I Use?
The most frequently asked question by beginners is "What lens should i buy?" It's a tough decision since there are so many options available.
The good news is that you don't necessarily need to buy a new lens every time you purchase a new camera. Instead, you can buy additional lenses later.
Here are three types you might be interested in.
-
Wide Angle Lens (14mm to 24mm): These lenses allow you to see more of your subject from a wider angle. Zooming in can be done without affecting image quality.
-
Standard/Normal Zoom Lens (28mm-70mm): These lenses let you change the focal length while still maintaining excellent image quality.
-
Telephoto Zoom Lens (70mm to 200mm): These lenses make it easy to capture distant subjects. These lenses allow you to focus on your subject, even though they may appear small in the frame.
You can also combine these lenses to create different effects. You can use a normal lens for close-up detail and switch to a zoom lens to capture distant objects.
How can I learn photography on my own?
There are many ways you can learn to take great pictures. There are many options: you can buy a book, take a class or join an online community. You can also watch YouTube tutorials. If you really want to learn how to take pictures, it's best to do it yourself. By doing it yourself, you are in complete control of what goes into each shot. And as long as you keep learning, you'll always improve.
One of the greatest things about digital photography, however, is the fact that you don’t need expensive equipment. All you need is an internet connected computer and a camera. The rest is up to you.
These are some suggestions to help you get started.
-
Learn how to use the manual settings on your camera.
-
Learn how to use the basic controls.
-
Take many photos.
-
Make sure to edit them.
-
These are yours to share.
-
Keep practicing.
-
Experiment.
-
Explore different perspectives and angles.
-
Use light sources creatively.
-
Practice makes perfect.
-
Be willing to fail.
-
Be patient.
-
Have fun
How can I become a professional photographer?
Photography is an art that takes patience, dedication and passion. Passionate about photography will make you do better than if it was just for the money.
You must learn how to use your digital camera correctly. Understanding composition, lighting, exposure and depth of field are all important. You also need to have a decent understanding of Photoshop.
Photography is not easy, but once you master it, there is nothing quite as satisfying as creating images that capture moments in time that would otherwise have been lost forever.
You can learn more by reading books, taking classes, or participating in competitions if you are looking to improve your skills. This will give you experience and confidence that will help you improve. What equipment do I need?
It all depends on what type photography you do. If you're interested in landscape photography, for example, you'll need a wide-angle lens.
A telephoto lens will be a must if you are interested in portrait photography.
A tripod is essential when taking photographs. It allows you to stand back and compose your picture without moving around.
Camera bags are useful for carrying your memory cards and other accessories.
If you have a compact digital camera, a flash unit will be necessary.
A DSLR (Digital Single Lens Reflex) camera is by far the best choice for beginners who want to take professional quality photos.
DSLRs are highly popular for their ability to control every aspect of a photo, such as shutter speed and aperture, ISO sensitivity, white-balance, focus, and white balance. There are many features available, including autofocus, self-exposure lock (auto-exposure lock), bracketing, and RAW format.
Is digital photography hard?
Digital Photography is not as easy as you think. It takes time and effort to learn how to use the tools properly. To be able to take different types of shots, you must know what settings are appropriate. Learning by doing is the best way to learn. Practice makes perfect.
Light Room can be used to enhance your photographs.
Start early to get the best photos possible for your project. It's always a good idea to take as many pictures as possible and then decide which ones will be the most valuable.
Lightroom allows you to do this by letting you see how different settings affect each photo. These settings can also be modified on-the-fly in Lightroom without ever having to open Photoshop again. This allows you to quickly test what looks great and what does not.
What is rule of thirds for photography?
The rule to thirds is a great way to create interesting compositions. It divides your image in nine equal parts, vertically and horizontally. It creates three main areas, where your subject should appear. These are the top and middle thirds (in the upper left corner), as well as the bottom and lower right. These areas can be used to position your subject within your frame.
The rule to thirds allows you to avoid placing important elements too closely together or too far apart. They might not have enough space to make an impact on the eye if they are placed close together. They might lose focus if they are too close together.
Statistics
- Get 40% off Adobe Creative Cloud(opens in new tab) (creativebloq.com)
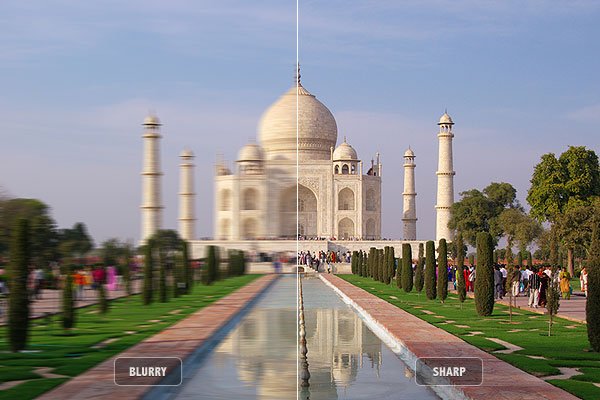
- The second easiest way to get blurry photos 100% of the time is to use a cheap filter on the front of your lens. (photographylife.com)
- By March 2014, about 3 million were purchased monthly, about 30 percent of the peak sales total. (en.wikipedia.org)
- That's the easiest way to get blurry photos 100% of the time. (photographylife.com)
External Links
How To
How to take macro photos in photography
Macro Photography refers to the ability take pictures of small objects like insects and flowers at close range. Macro (from the Greek makros, meaning large) is from the Greek word makros. A lens with a focal length over 50mm can be used to take photos of objects very close up.
A macro lens with a good working distance should be able to capture sharp images even when you are not moving too much. Also, avoid moving while taking photos as it could blur your image.
Here are some tips for taking great macro photographs:
-
Use a tripod. Use a tripod. You'll be less likely to move while you shoot.
-
Select the right lighting. Macro lenses usually come with built in light filters. But if you don’t, you can always buy one. It helps to avoid overexposure.
-
Be patient! Shooting macros takes practice. Even though you might only see one tiny bug or flower at a time, it is worthwhile to continue shooting until you capture it.
-
RAW files are best for shooting. RAW files are more detailed than standard JPEGs and contain more data. Because you can edit the RAW files later, such as cropping or color corrections, they are ideal for editing.
-
It's important to remember the background. Even though you've got a nice foreground object, sometimes the background adds interest to your shot. Include it in your shot.
-
Keep learning.